Tuesday, December 27, 2011

UI Test Automation in iOS

A few months back I did a blogpost on Android UI Testing http://hariniachala.blogspot.com/2011/09/android-application-ui-testing-with.html. This post covers the inbuilt tools available in iOS for automated UI testing.

iOS SDK 4 included the 'Automation' tool for UI test automation. However the procedure is a bit cumbersome. There is no record and playback tool for test and all tests have to be scripted.

To run the Automation tool in Xcode 4 or higher open your iOS project and select Product -> Profile from menu. Next select the Automation icon from the wizard that opens.


When instruments opens with Automation tool selected you will see the following window..
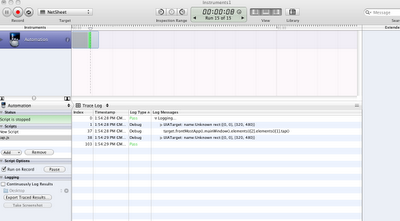


In the Scripts section select Add and Create. This will create a new ui test automation script. These scripts are written in javascript. Below is an example script..

UIALogger.logStart("Logging…");
UIATarget.localTarget().logElementTree();
UIATarget.localTarget().frontMostApp().mainWindow().elements()[2].elements()[1].tap();
UIALogger.logPass();

This script starts by logging the message "Logging.." and then logging the element hierarchy of the currently selected window in the application. Logging the element hierarchy here helps us to understand how we should call a specific element in the window. You can also call elements by their label. See Apple's documentation (http://developer.apple.com/library/ios/documentation/DeveloperTools/Conceptual/InstrumentsUserGuide/Built-InInstruments/Built-InInstruments.html#//apple_ref/doc/uid/TP40004652-CH6-SW76) for details. After determining the element heirarchy we use that information to call a tap() (identical to a physical tap) on that element. We close the logging with logPass().

Next you need to select the application target on which you want to run the test script. See the screenshot below for details on how to do this..


Now you can run your test by clicking on the record button. Watch and monitor the trace log as your test runs on the simulator.

In this manner even a complex UI test flow can be automated, especially if that test procedure needs to be repeated (eg: generating reports for different data). However as you can see the procedure of writing the automated test is quite time consuming.

Conclusion : Comparing the tools available for UI test automation currently android seems to be one step ahead in the game (it provides a test record and playback tool (see my previous blogpost on android ui testing ). Still both mobile platforms have a lot to be improved in their automation test tools..

References:

http://stackoverflow.com/questions/3801344/how-do-i-test-my-ios-apps
http://developer.apple.com/library/ios/#documentation/DeveloperTools/Conceptual/InstrumentsUserGuide/Built-InInstruments/Built-InInstruments.html#//apple_ref/doc/uid/TP40004652-CH6
Thursday, September 22, 2011

Samsugn Lab.dev

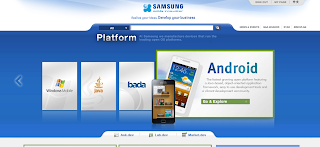
Samsung's Lab.dev is another cloud based mobile application testing service. This article is a summary of my experience with it specific to Android. The site also supports Windows Mobile, Java and bada testing.

What's great about it:)

- It's free!

What's not so great about it:(

- Limited functionality (no automated testing)
- Limited devices (only Samsung devices)
- Each session on a device is valid for a max of 30min.


For those of you who would like to try it out here's how..

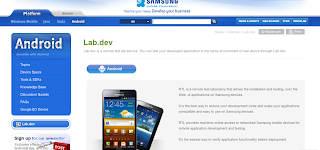
Go to https://innovator.samsungmobile.com/mbr/individual.mbr.add.do and register a new account. Sign in with the new account you created. Select Android page (see screen shot below..)


Now select Lab.dev from left of the screen (see pic below..)


Now click the Android button (see pic..)


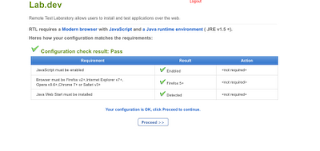
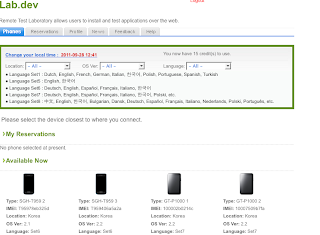
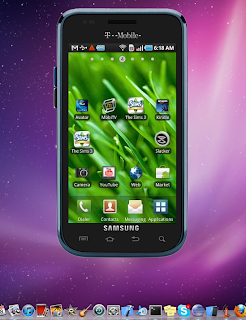
A requirements test will follow. If all requirements are met you can proceed to the lab screen where you can select the device you want from what is available (see screen..). One you've decided on a device select 'Start' to download the java web start app(.jnlp file) that will show you the running device (grant required permissions for the application to run on your pc).


You can test your android apps on the device by downloading the .apk files onto it over the internet.

More screenshots...


Tuesday, September 20, 2011

Perfecto! - Cloud mobile testing

Perfecto is the Spanish word for perfect. It is also the name of a cloud mobile testing service (http://www.perfectomobile.com). For an overview of how perfecto offers cloud mobile testing services please see their video(embeded below).


The perfecto website offers a 1 hour free trail for testing their service. This blogpost is an overview of my trial usage of perfecto.

Perfecto Free Trail Overview

For my trial experimenting I picked the Motorola Droid handset. We have one of these handsets at work. I picked this handset so I can rate my virtual testing experience against the real thing. Having completed my trial testing period I would say the virtual experience was quite realistic although it was a few seconds slower to touch and other event responses. Below are screenshots taken during the trail.


What I liked about perfecto:

- I could manipulate the virtual device much the same way as the real device. One functionality I couldn't trigger was the keypad open/close, but perhaps that functionality has been omitted from the trail version.

- Installing .apk files to the virtual device was a breeze.

- I could easily trigger incoming calls and sms on the virtual device(note: even though I refer to the perfecto device as 'virtual' it is in actuality a real device - refer video above). Triggering these actions on a real device would have been a little bit more cumbersome.

Perfecto does seem like a close to perfect solution for mobile testing on the cloud. However I was disappointed to find that the feature I was really looking forward to trying out; automation testing, was not available in the trial. If automated testing is as good as it appears in the video, then that would definitely make perfecto just perfect!:)

Monday, September 19, 2011

Android Application UI Testing (with monkey and monkeyrunner)

Android has some built in UI testing tools. These tools can be used for automated UI testing. However the tools are not so simple to use. This post is an attempt to set a guideline towards using these tools.

There are 2 main UI testing tools available

1.monkey (aka. UI/Application Exerciser Monkey)

This tool is a command line based tool that can be primarily used to stress test your application UI. It is the simplest tool to use. Here's how..

Running monkey as an application UI stress tester (runs a random set of commands on the application. useful to UI stress testing)

- Open a command console.
- First direct your console to the location of the adb (Android Debug Bridge) program in the android sdk. Typically you can use the following command for this..

$cd path_to_android_sdk/platform-tools/

path_to_android_sdk should be the path to the sdk on your pc

- Now make sure you device is connected with the application running on it or that the emulator is running the application.

- To test on device issue the following command in the console

$./adb -d shell monkey -p package_name -v 1000

(replace -d with -e to test on the emulator.
package_name is the name of the application package abnd it usually begins with com.
-v specifies the number of UI events to be generated, in this case we ask it to generate 1000 random events)

Now you will see the monkey stress testing your app.

If you get force close message while running monkey you have just discovered a bug that needs fixing. You can run

./adb logcat

in the console to generate the relevant logs.


Running specific commands in monkey
The monkey tool can also be used to run a specific set of commands on the application. However it is easier to use the monkeyrunner for this purpose.

On the connected device (to run on emulator simply replace -d with -e)

./adb -d shell monkey -p package_name --port 1080 &
./adb -d forward tcp:1080 tcp:1080
telnet localhost 1080

Now the following will be printed on cmd line..

Trying ::1...
Trying 127.0.0.1...
Connected to localhost.
Escape character is '^]'.

Now you can type in your instructions

>tap 150 200

you can write all instruction into a script (script.txt) as below..

# monkey
tap 100 180
type 123
tap 100 280
press DEL
press DEL
press DEL
press DEL
press DEL
press DEL
press DEL
press DEL
type -460.3

now run..

./adb -d shell monkey -p package_name --port 1080 &
./adb -d forward tcp:1080 tcp:1080
nc localhost 1080 < script.txt


2. monkeyrunner

The monkeyrunner tool is an API for writing automated UI tests. You can use it to write specific scripts that run a series of commands and inspects the output by taking screenshots etc. The android SDK includes two special scripts written using monkeyrunner which help in running automated UI tests. The scripts are..

monkey_recorder.py
monkey_playback.py

Copy these scripts to /tools folder in the android sdk. Set the console path to the tools directory. Open up the application on the emulator.

You can run the recorder as follows..

./monkeyrunner monkey_recorder.py

Below is a screenshot of monkey_recorder recording actions for calculator.


Use 'Export Actions' button to export the set of actions into a script (eg: calc.mr)

now run the cal.mr script on a connected device as follows.. (first make sure the emulator is shut down)

./monkeyrunner monkey_playback.py calc.mr

For playback to run properly you need to take precautions of setting the correct wait times and using the correct press, fling, type methods in the recorder.

Conclusion: Android has a good collection of tools meant to enable UI test automation. However they still have a lot more room for improvement especially in terms of ease of use and efficiency.

References:

http://developer.android.com/guide/developing/tools/monkey.html
http://developer.android.com/guide/developing/tools/monkeyrunner_concepts.html
Android Application Testing Guide - Diego Torres Milano

Friday, August 19, 2011

My take on Android vs iPhone development


As a mobile application developer I would like to share my experience with iOS and Android so far. At the end of this post I will rate my developer experience with each of the OSs and announce my favorite mobile OS!

I began my mobile application development experience with iOS. Coming from a Java programming background venturing into the murky waters of Objective C was a bit scary at first (I'd never even heard of Objective C until I looked into iOS). All I knew when starting off with Objective C was that it was a language similar to C and C++. That meant having to deal with memory pointers and no one who is a fan of Java and its garbage collector likes meddling with pointers again. Fortunately iOS apps are built around the MVC (Model-View-Controller design pattern), which meant there were standardized ways for dealing with pointers, you just needed to follow some routines and rules. But it isn't always easy.

But once I had got the hang of Objective C syntax and the Apple iOS API, things became a lot more easier. My favorite part of iOS development was using Interface Builder. The latest version of Xcode has this interface designer built into Xcode and it makes designing great looking iphone apps a breeze! Some developers prefer designing their UIs programmatically because that allows them to reuse design code in multiple apps but using interface builder makes the task of UI design much faster! The iOS API has practically every UI widget you can want on an app already available. So that makes your UI design task so much easier. I personally think the iOS UI widgets are much prettier than the current android widgets. Maybe because Steve Jobs is more peculiar about UI design than the folks at Google. So in conclusion for my take on iOS development I would say that what I like about it is the ease with which I can develop better looking UIs.

As for Android development I started off here doing an experimental app (which is now on the Android Market!:) ). My biggest complaint when trying out Android development was that at the time I started off I didn't own an Android handset. This meant that I had to run all my code on the emulator. When I started developing I was using the android api8. And gosh did it have the slowest emulator ever! Thankfully Android has since then increased their emulator speeds. But its still much slower than running on an actual device. Unlike the iPhone simulator, which simulates an iOS environment running on Mac h/w, the Android emulator emulates the entire Android device enviroment (including the h/w enviroment : SD card size, memory capacity etc.). So you can't blame it for being slow. But as long as you forget the emulator and stick to using a device for running your code during development, you will have a much happier android dev experience:)

The next thing that bugged me when starting off Android development was their UI designer. I used Eclipse along with the Android plugin for development. And even the currently available plugin is quite disappointing when it comes to UI designing. If your first mobile dev experience was with Android then this may not be that big a deal. You will just learn to navigate UI design using XML and not complain about it. But if you were an Interface Builder fan switching from iOS development to Android then you will be thoroughly disappointed. Seems Android folks are developing a WYSIWYG editor for the eclipse plugin though, this should provide a better rival for Interface Builder. Also I would rate the currently available UI widgets in iOS as better than Android ones in terms of their design and also ease of use in the code. Those cons aside developing Android apps is a joy because you are dealing with Java here. If you have some development experience in Java then there is no more learning required. Best of all the garbage collector handles all the nasty memory management details for you.

So here's my final rating.. Please note that the ratings below are entirely based on my own personal evalution.

1. UI design
iOS - 9/10
Android - 7/10

2. Ease of setting up dev environment
iOS - 3/10 (you need to get a mac first! and buy an iphone too or just forget about it!)
Android - 10/10 (can be done on a pc running any OS. and all dev tools required are freely available over the interent).

3. Deployment
iOS - 6/10 (the process of deployment is so cumbersome and restricted. but on the plus side this ensures that your app is of the best possible quality. still i think Apple can do more to simplify the deployment process)
Android - 5/10 (deploying an android app to the market is a breeze. but this really lowers the quality of apps out there)

4. Developing for different devices
iOS - 10/10 ( fixed screen sizes.)
Android - 2/10 ( varying screen sizes. different device hardwares. compatibility nightmare!)

5. Development language
iOS - 5/10 (strange and repetitive syntax.)
Java - 7/10 (Java is easy to develop with but runs slower)

6. Available resources for developers
iOS - 7/10 (the NDA delays developers from getting the info they need to support upcoming iOS releases in their apps)
Android - 10/10 (opensource. hurray!)

7. Debugging
iOS - 4/10 (can be a total nightmare even with tools like NSZombie setup. write perfect code or suffer!)
Android - 9/10 ( except for the occasional system crashes which leave baffling messages android dev tools are quick to point out exactly where you made a mistake in your code)

Some simple arithmetic results in Android being placed as the winner with 7.1429/10 vs 6.2857/10 for iOS.

For more developer takes on Android vs iOS please see:

http://whereoscope.wordpress.com/2010/12/07/android-vs-ios-a-developers-perspective/

http://nfarina.com/post/8239634061/ios-to-android

Tuesday, August 9, 2011

Making sense of crash logs from iPhone apps

Ohoh your iphone app just crashed! One way to debug the crash is by inspecting the crash log. Here's how..

1. Before releasing the application for iphone you must first build your app for Archiving on xcode.
This will generate both the ProjectName.app and ProjectName.app.dSYM files. You will see the generated ProjectName.app file in the target section of the project in xcode. Selecting the 'Show in Finder' option(right click target ProjectName.app file) will reveal the location of both these required files. Copy these files to a new folder named Project_CrashDebugging.

2. Sync your iphone using itunes. Now your applications crash logs will have been copied to the computer. Generally you can find them at the following path your_home_folder_name/Library/Logs/CrashReporter/MobileDevice/your_device_name

3. Select the crash log from your project and copy it to Project_CrashDebugging folder you created earlier.

4. To demystify the crash log you will need to use the symbolicatecrash application. Typically it will be located at the following path /Developer/Platforms/iPhoneOS.platform/Developer/Library/PrivateFrameworks/DTDeviceKit.framework/Versions/A/Resources/. If not find it in your hard drive by searching for it using the locate function in console. Once you have found it copy it to one of your computers Path location (check you path locations using echo $PATH in console), generally copying /usr/bin will do. Now you can call symbolicatecrash directly from the console.

5. cd to your Project_CrashDebugging folder and now call..

symbolicatecrash crash_log_name ProjectName.app.dSYM > filename.crash

now you will have created a symbolicated filename.crash file which you can refer for debugging


Given below are parts of an example application I use to try out symbolicatecrash.

from ExampleViewController.m

- (void)viewDidLoad
{
NSString *test = [[[NSString alloc] initWithFormat:@"Test"] autorelease];
[test release];

NSLog(@"Test is: %@", test);//calling test after release will result in a crash
[super viewDidLoad];
}

from initial crash log..

Date/Time: 2011-08-10 11:09:33.253 +0530
OS Version: iPhone OS 5.0 (9A5288d)
Report Version: 104

Exception Type: EXC_BAD_ACCESS (SIGSEGV)
Exception Codes: KERN_INVALID_ADDRESS at 0x576e6f69
Crashed Thread: 0

Thread 0 name: Dispatch queue: com.apple.main-thread
Thread 0 Crashed:
0 libobjc.A.dylib 0x36c85fc2 0x36c82000 + 16322
1 Foundation 0x35238bb8 0x3522f000 + 39864
2 CoreFoundation 0x354e3d06 0x35454000 + 589062
3 CoreFoundation 0x35477d24 0x35454000 + 146724
4 CoreFoundation 0x354984b0 0x35454000 + 279728
5 Foundation 0x3524c914 0x3522f000 + 121108
6 Foundation 0x3524c8b4 0x3522f000 + 121012
7 Example 0x000027a4 0x1000 + 6052
8 UIKit 0x34a3c124 0x349ff000 + 250148
9 UIKit 0x34a1777a 0x349ff000 + 100218
10 UIKit 0x34b6d288 0x349ff000 + 1499784
11 Example 0x00002538 0x1000 + 5432
12 UIKit 0x34a17f1c 0x349ff000 + 102172
13 UIKit 0x34a070e6 0x349ff000 + 32998
14 UIKit 0x34a06032 0x349ff000 + 28722
15 UIKit 0x34a05ad0 0x349ff000 + 27344
16 UIKit 0x34a055ea 0x349ff000 + 26090
17 GraphicsServices 0x33f27ef4 0x33f23000 + 20212
18 CoreFoundation 0x354d79c4 0x35454000 + 539076
19 CoreFoundation 0x354d7966 0x35454000 + 538982
20 CoreFoundation 0x354d658c 0x35454000 + 533900
21 CoreFoundation 0x35478036 0x35454000 + 147510
22 CoreFoundation 0x35477efe 0x35454000 + 147198
23 UIKit 0x34a03758 0x349ff000 + 18264
24 UIKit 0x34a0098a 0x349ff000 + 6538
25 Example 0x000024ba 0x1000 + 5306
26 Example 0x00002478 0x1000 + 5240


from symbolicated crash log..

Date/Time: 2011-08-10 11:09:33.253 +0530
OS Version: iPhone OS 5.0 (9A5288d)
Report Version: 104

Exception Type: EXC_BAD_ACCESS (SIGSEGV)
Exception Codes: KERN_INVALID_ADDRESS at 0x576e6f69
Crashed Thread: 0

Thread 0 name: Dispatch queue: com.apple.main-thread
Thread 0 Crashed:
0 libobjc.A.dylib 0x36c85fc2 0x36c82000 + 16322
1 Foundation 0x35238bb8 0x3522f000 + 39864
2 CoreFoundation 0x354e3d06 0x35454000 + 589062
3 CoreFoundation 0x35477d24 0x35454000 + 146724
4 CoreFoundation 0x354984b0 0x35454000 + 279728
5 Foundation 0x3524c914 0x3522f000 + 121108
6 Foundation 0x3524c8b4 0x3522f000 + 121012
7 Example 0x000027a4 -[ExampleViewController viewDidLoad] (ExampleViewController.m:35)
8 UIKit 0x34a3c124 0x349ff000 + 250148
9 UIKit 0x34a1777a 0x349ff000 + 100218
10 UIKit 0x34b6d288 0x349ff000 + 1499784
11 Example 0x00002538 -[ExampleAppDelegate application:didFinishLaunchingWithOptions:] (ExampleAppDelegate.m:24)
12 UIKit 0x34a17f1c 0x349ff000 + 102172
13 UIKit 0x34a070e6 0x349ff000 + 32998
14 UIKit 0x34a06032 0x349ff000 + 28722
15 UIKit 0x34a05ad0 0x349ff000 + 27344
16 UIKit 0x34a055ea 0x349ff000 + 26090
17 GraphicsServices 0x33f27ef4 0x33f23000 + 20212
18 CoreFoundation 0x354d79c4 0x35454000 + 539076
19 CoreFoundation 0x354d7966 0x35454000 + 538982
20 CoreFoundation 0x354d658c 0x35454000 + 533900
21 CoreFoundation 0x35478036 0x35454000 + 147510
22 CoreFoundation 0x35477efe 0x35454000 + 147198
23 UIKit 0x34a03758 0x349ff000 + 18264
24 UIKit 0x34a0098a 0x349ff000 + 6538
25 Example 0x000024ba main (main.m:14)
26 Example 0x00002478 start + 32

Wednesday, June 1, 2011

Screenshots of feed reader application

Here are screenshots of the feed reader application I just completed. Hopefully this will be in the market soon! The application uses a bayesian based ranking algorithm to rank feed items according to their popularity among other application users before displaying them (ie: most popular items appear first). It's a simple tab based application with a setup tab for configuring feeds, a tab to display ranked feed items and a bookmarks tab for viewing bookmarked feed items.

It's the last month of my AIESEC internship here in Lisbon, Portugal. I'm going to miss life in Lisbon when I return home, but I'm looking forward to going home again after 6 months!:) Wonder if Colombo has changed in those 6 months..


Friday, April 8, 2011

Colombo Stock Exchange iPhone Application

This is a simple application I did while learning iphone application programming. Since I don't have my own apple developer account ( that costs $99 a year ) I thought I'll just mention it here and share the link to the built application which can be run on the simulator.


How to run compiled binary on iphone simulator:

Saturday, March 26, 2011

Mozilla in Google Summer of Code 2011


GSoC 2011 is here and as always the Mozilla Foundation is a participating project. I really like this year's summer of code logo. The design looks like it's based on the movie TRON.

Mozilla's summer of code projects for this year can be found here:

https://wiki.mozilla.org/Community:SummerOfCode11

Seamonkey projects:

https://wiki.mozilla.org/Community:SummerOfCode11#SeaMonkey

There are two great projects for Seamonkey and both are for the mailnews component. I wish the very best of luck for the students who apply for this year! I really learned a lot from my summer of code with Seamonkey last year:)

Another interesting news is that one of my friends who encouraged me to take part in summer of code last year is a gsoc mentor for this year! Congratulations Pradeeban!:) Have a great summer of code!:)